Welcome to this post, where we are going to see how anyswap works and those aspects that you should know to use its main function, passing tokens from one network to another.
Anyswap is the platform with more bridges or options to move tokens from one network to another, with many networks that you can use. In addition, it has its own network for liquidity and different options to send tokens to anyswap and withdraw them using another network.
In this guide we are going to focus on the bridge part, which is the most used and fundamental aspect of anyswap, being the bridge with the most networks that you can select and send tokens from one network to another. There are also other functions that the platform has, such as providing liquidity in exchange for an annual %, like other platforms, but we will focus on its main function.
What is Anyswap
Anyswap is a fully decentralized cross-chain exchange protocol based on Fusion DCRM technology with automated pricing and liquidity. Anyswap is a decentralized application running on Fusion , Binance Smart Chain , Ethereum, Fantom blockchains and many other networks. Anyswap’s first application is a DEX (Decentralized Exchange), which is called anyswap.exchange.
Unlike other bridges that focus on one or a few networks, anyswap has sought to give a solution to most networks and create its own network to allow liquidity in the vast majority of networks and optimize the bridge between different networks. The FSN Mainnet is Anyswap’s network, where you will be able to see all the transactions you make using its platform, whether router or bridge and have a txid of your transaction.
Anyswap is one of the platforms or the one with more networks available to send tokens from one to another. Although it is important to know that not all networks are compatible with all of them, this will depend on the token you want to send and the liquidity in each network. For example, you can send tokens from BSC to Matic, but from Matic to Avalanche you will not be able to send Matic.
Aspects to consider
Before looking at the step-by-step on how to use anyswap, there are some things to consider. The first thing is that you will not be able to send just any token from one network to another. You will see that when you select a network, it will only let you send certain tokens, and this is due to liquidity. There are tokens that in other networks there is no liquidity, and you would be sending a token that you cannot use.
Therefore, before sending a token from one network to another, I recommend you go to the main DEX and see if there is liquidity to use this cryptocurrency. There is no point in having for example BNB on the Fantom network, if you can’t exchange it for anything. Each network usually has a main DEX, for example pancakeswap, trader joe, spookyswap, terraswap, uniswap each in different networks.
Once you have verified that you will be able to exchange your token on a DEX, you can send it without fear of not being able to use it. Another recommendation is to send a small amount first, to avoid sending large amounts and encountering a problem, such as lack of liquidity or some kind of error and see that it works well.
Also, I recommend you always send stablecoins, either USDC, USDT, BUSD, UST as the main ones among many different stablecoins. The main reason, is that there is usually liquidity of these cryptocurrencies in most networks, and the transaction can take 10-30 minutes as we will now see, and being stablecoins you will not have the risk that during this time it can fall in value. Although it is a short time, if you are unlucky, you may find that if you send a token as BNB, its price has fallen during the time it has taken for the transaction to take place.
If you keep these tips and aspects in mind, you will have no problem using anyswap, or any other bridge between different networks.
Bridges
To pass tokens from one network to another, you can use the router or bridge option. In this guide we will focus on the bridge part, although the operation is very similar.
The first thing to do is to connect our wallet to the network we want to send tokens to. For example, metamask with the Binance Smart chain connected.
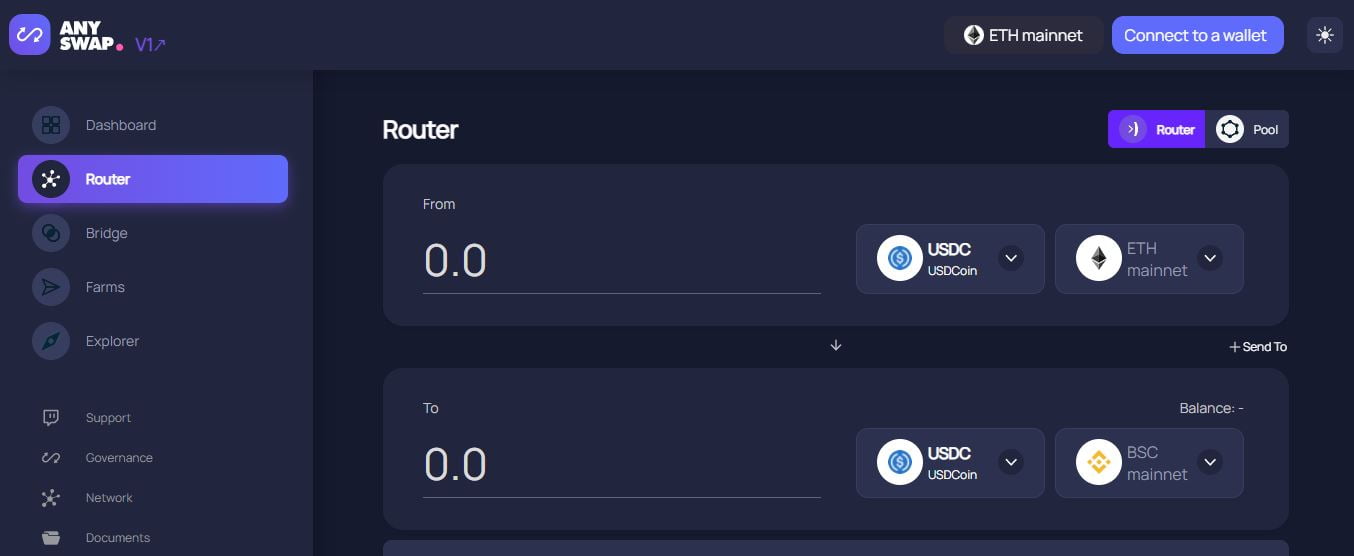
In bridge you will see from where it detects the network you are in, and on the right side you will see the network, and on the left side the token. Now, the next step is in the to part, select the network where you want to send the tokens. Either matic, avalanche or any other. Note that there are EVM, and Non-EVM networks. Non-EVM networks are mainly BTC, Terra. Usually and most commonly you want to pass tokens from EVM networks, so select this option which is already set by default.
In to select the network where you want to send your cryptocurrencies, and the next step is to select the cryptocurrency you want to send. You will see that in each network there are different cryptocurrencies available to send. Another way is to select from the network where you have the tokens and the token you want to send. This way, anyswap detects the networks where you can send that token.
If the network you want does not appear, you will have to select another token to send in that network. For example, if USDT is not available in avalanche, you may have to use BUSD or USDC which you can send without problems using anyswap.
In from indicate the amount and you will see what you will receive. It is very important to read the information below, where you can see the minimum you can send, the cost of making the transaction, in each network and token is different and usually varies, but is usually not very high. And other relevant aspects such as the time it takes to arrive. Usually it is between 10-30 minutes, so do not worry if you do not have it within a few minutes after making the swap.
With this information in mind, enter the amount in from, see what you will receive in to and click on swap. Confirm in your wallet, and that’s it. In case it is another wallet, you will have to connect it to anyswap or indicate the address of your wallet where you want to receive the funds.
In the case of non-EVM, you will have to use two wallets. For example, if you want to send UST from terra network to Fantom network. You will have to do the same process as above, but connecting your terra station wallet, and your metamask wallet with the fantom network configured or another fantom compatible wallet. In the same way with other non-evm networks such as Bitcoin or Blocknet among others.
I hope it has helped you to know more in detail how anyswap works and how to use it. Remember that if you don’t have an account with binance, you can create one just below.